
![]()
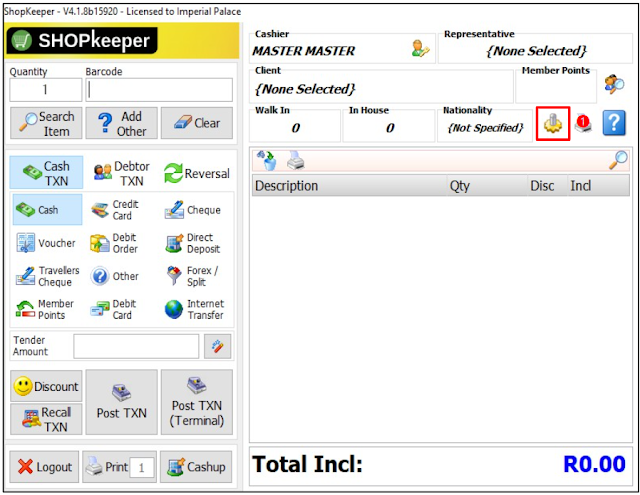
❶ POS System Setup window
หน้าต่าง POS System Setup
❷ Locate & Select: select any of the Slips options.
ค้นหาและเลือก: เลือกตัวเลือกใบเสร็จใดก็ได้
➌ Designed Slip tab
แถบ Designed Slip
➍ Select the Configure Designed Slip Presets (gear button)
เลือกปุ่มกำหนดค่าล่วงหน้าของใบเสร็จที่ออกแบบ (ปุ่มรูปเฟือง)
Note: the Designed Slip tab can be accessed from any of the following Slip locations;
หมายเหตุ: แท็บใบเสร็จที่ออกแบบสามารถเข้าถึงได้จากตำแหน่งใบเสร็จใด ๆ ต่อไปนี้;
- Tax Invoice (ใบเสร็จ)
- Account Payment (ใบเสร็จสำหรับการชำระเงินเข้าบัญชีลูกค้า)
- Reversal (ใบเสร็จที่ถูกยกเลิก)
- Account Payment Reversal (ใบเสร็จที่ถูกยกเลิกสำหรับการชำระเงินเข้าบัญชีลูกค้า)
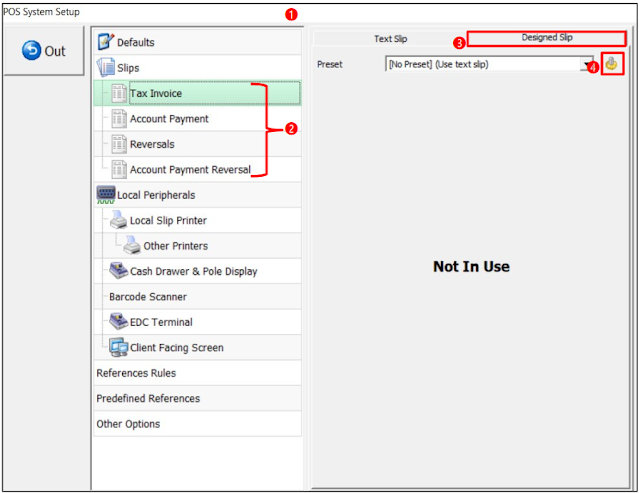
หน้าต่าง Print Preview – Slip
❷ Report Layout: select the Report Layout Actions (wand button) to access the hidden list. Select the Create New Layout option
Report Layout: เลือกรายการจัดรูปแบบรายงาน (ปุ่มไม้คฑา) เพื่อเข้าถึงรายการที่ซ่อนไว้ จากนั้นเลือกตัวเลือก Create New Layout

❶ Slip Layout Name window
หน้าต่าง Slip Layout Name
❷ Type in the Slip Name
พิมพ์ชื่อสลิป
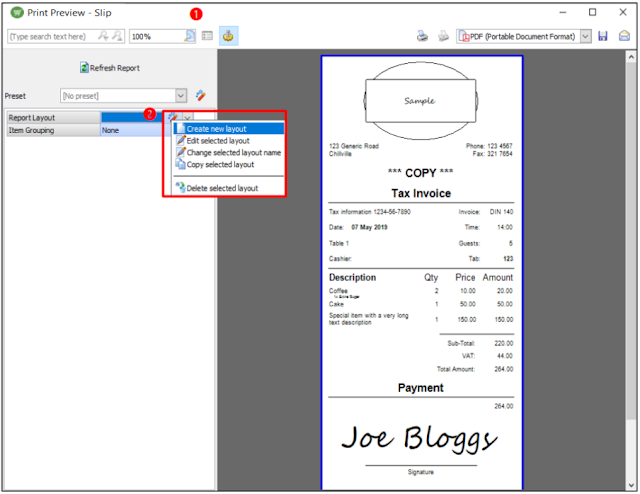
❶ Print Preview – Slip window
หน้าต่าง Print Preview – Slip
❷ Report Layout: select the Report Layout Actions (wand button)
เค้าโครงรายงาน: เลือกการแก้ไขเค้าโครงรายงาน (ปุ่มรูปไม้กายสิทธิ์)
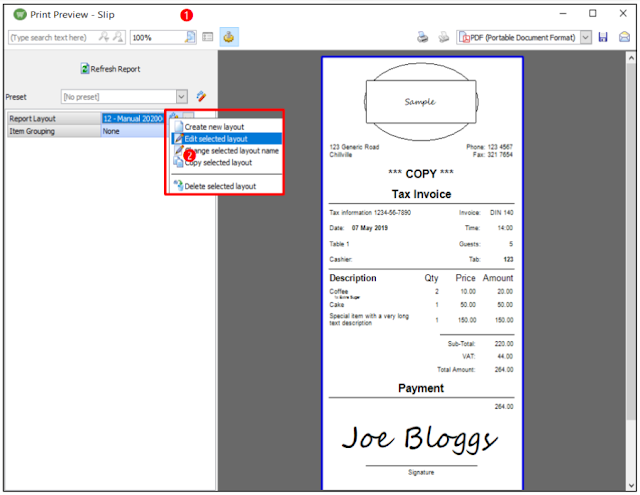
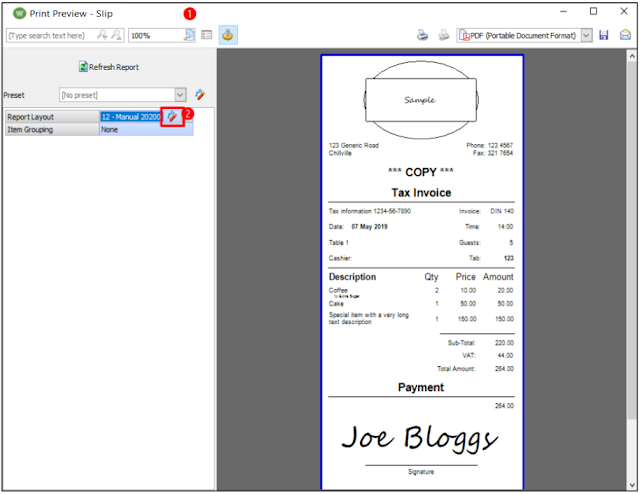
แสดงตัวอย่างก่อนพิมพ์ – หน้าต่าง Slip Designer
❷ Report Layout: select the Report Layout Actions (wand button) to access the hidden list, select the Edit Selected Layout option
การกำหนดค่า: เลือกวัตถุรายงาน
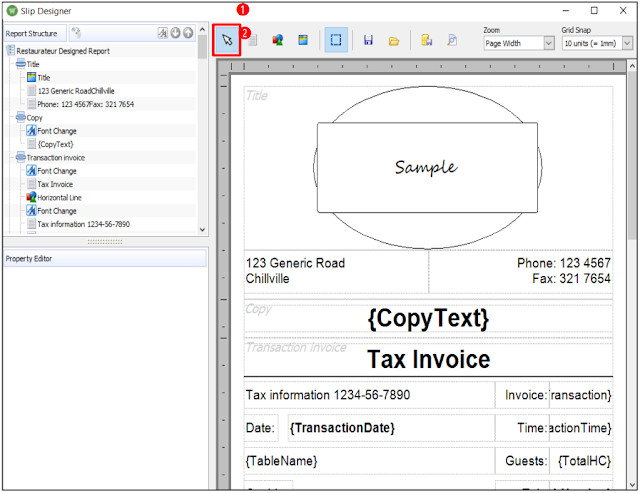
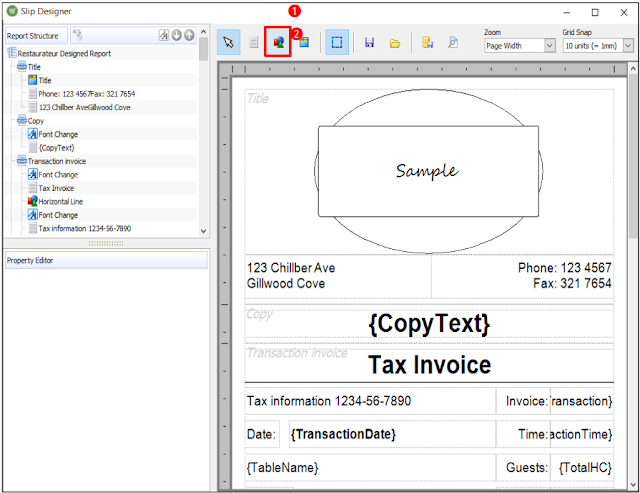
❶ Shopkeeper Slip Designer window
หน้าต่าง Shopkeeper Slip Designer
❷ Select the Select Report Object (curser block button)
เลือกปุ่มลากวัตถุ (ปุ่มเคอร์เซอร์)
หมายเหตุ: ฟังก์ชันนี้ช่วยในการเลือกวัตถุหรือบล็อก/โซนในสลิป
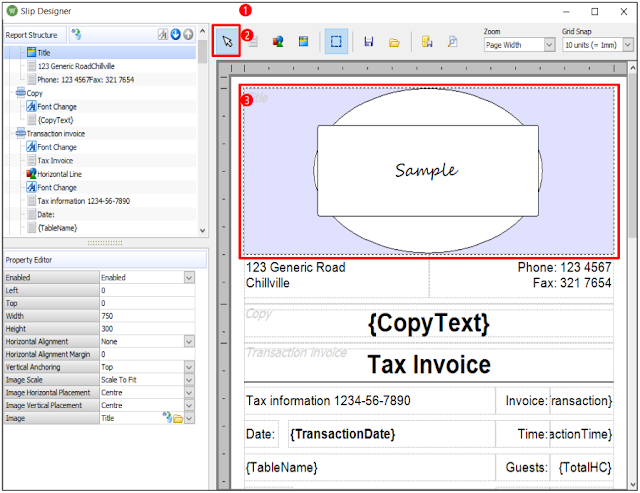
❶ Shopkeeper Slip Designer window
❷ Select Report Object (curser block button)
➌ Locate & Select: select the Object / Block / Zone on the slip
❶ Shopkeeper Slip Designer
window
❷ Select the Add Text Object (line page button)
➌ Locate & Select: Click & Drag to draw a Text Box
➍ Text: use the Edit Text (page & pencil button)
❷ Type in the Text details
การกำหนดค่า: ข้อความที่เพิ่มเข้าไป
❶ Shopkeeper Slip Designer window
หน้าต่าง Shopkeeper Slip Designer
❷ The Added Text in the Text Box
ข้อความที่เพิ่มในกล่องข้อความ
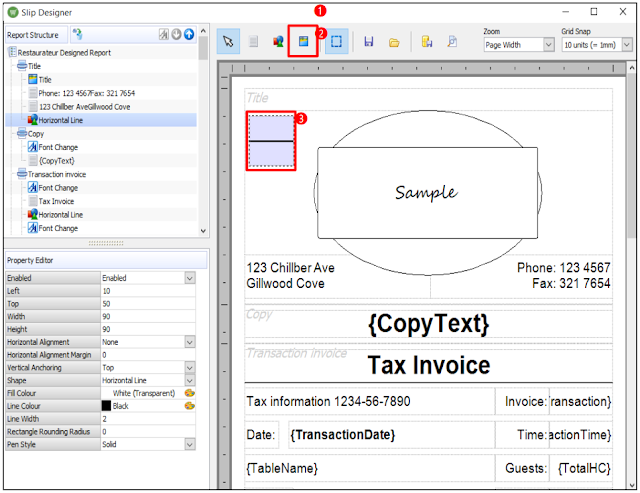
Configuration: Add Shape
การกำหนดค่า: เพิ่มรูปร่าง
❶ Shopkeeper Slip Designer window
หน้าต่าง Shopkeeper Slip Designer
❷ Select the Add Shape (shapes button)
เลือกเพิ่มรูปร่าง (ปุ่มรูปร่าง)
❶ Shopkeeper Slip Designer window
หน้าต่าง Shopkeeper Slip Designer
❷ Add Shape (shapes button)
➌ Locate & Select: Click & Drag to draw the shape
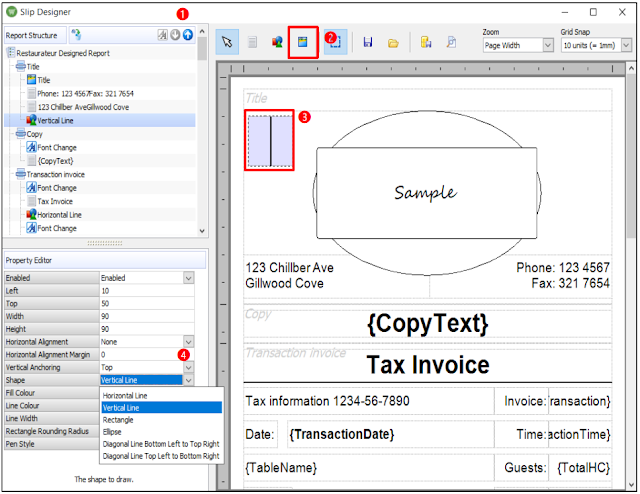
Configuration: Shape
การกำหนดค่า: รูปร่าง
❶ Shopkeeper Slip Designer window
หน้าต่าง Shopkeeper Slip Designer
❷ Add Shape (shapes button)
➌ Locate & Select: Click & Drag to draw the shape
➍ Shape: use the Drop Down to access the list of options – select the shape option
รูปร่าง: ใช้เมนูแบบเลื่อนลงเพื่อเข้าถึงรายการตัวเลือก – เลือกรูปร่างที่ต้องการ

Configuration: Fill Colour – Colour Selection
การกำหนดค่า: สีพื้นหลัง – การเลือกสี
❶ Shopkeeper Slip Designer window
หน้าต่าง Shopkeeper Slip Designer
❷ Add Shape (shapes button)
➌ Locate & Select: Click & Drag to draw the shape
➍ Fill Colour: select the Colour Palette (paint tray button)
สีพื้นหลัง: เลือกพาเลตสี (ปุ่มจานสี)
❺ Colour window
หน้าต่างสี
❻ Locate & Select: select the desired Colour
ค้นหาและเลือก: เลือกสีที่ต้องการ
❼ Select the OK button
เลือกปุ่ม OK
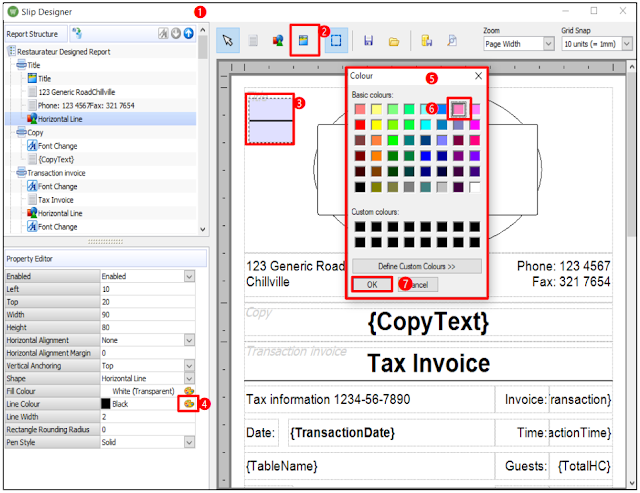
Configuration: Line Colour – Colour Selection
การกำหนดค่า: สีเส้น – การเลือกสี
❶ Shopkeeper Slip Designer window
หน้าต่าง Shopkeeper Slip Designer
❷ Add Shape (shapes button)
➌ Locate & Select: Click & Drag to draw the shape
ค้นหาและเลือก: คลิกและลากเพื่อวาดรูปร่าง
➍ Line Colour: select the Colour Palette (paint tray button)
สีเส้น: เลือกพาเลตสี (ปุ่มจานสี)
❺ Colour window
หน้าต่างสี
❻ Locate & Select: select the desired Colour
ค้นหาและเลือก: เลือกสีที่ต้องการ
❼ Select the OK button
เลือกปุ่ม OK
การกำหนดค่า: อ้างอิง – โครงร่างการออกแบบ (ที่แสดง)
❶ Shopkeeper Slip Designer window
หน้าต่าง Shopkeeper Slip Designer
❷ Select the Show design Outline (boarder button)
เลือกปุ่ม แสดงโครงร่างการออกแบบ (ปุ่มขอบเส้นประ)
➌ Reference to the View of the Design (boarder) Outline - Showing
อ้างอิง
การกำหนดค่า: อ้างอิง – โครงร่างการออกแบบ (ซ่อน)
❶ Shopkeeper Slip Designer window
หน้าต่าง Shopkeeper Slip Designer
❷ Select the Show design Outline (boarder button)
เลือกปุ่ม แสดงโครงร่างการออกแบบ(ปุ่มขอบเส้นประ)
➌ Reference to the View of the Design (boarder) Outline - Hidden
อ้างอิงถึงมุมมองของโครงร่างการออกแบบ (ขอบ) - ซ่อน
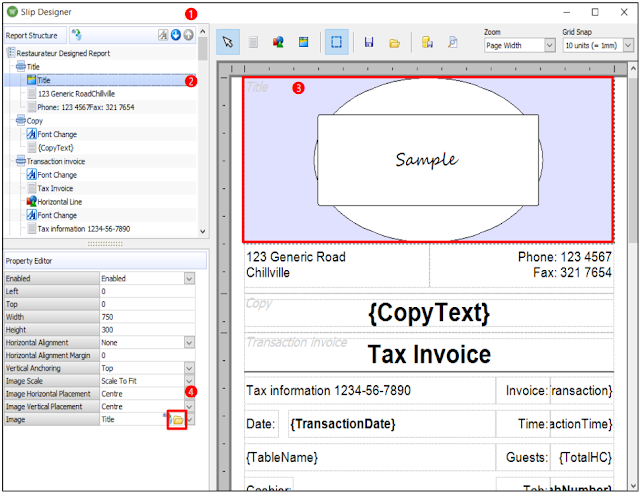
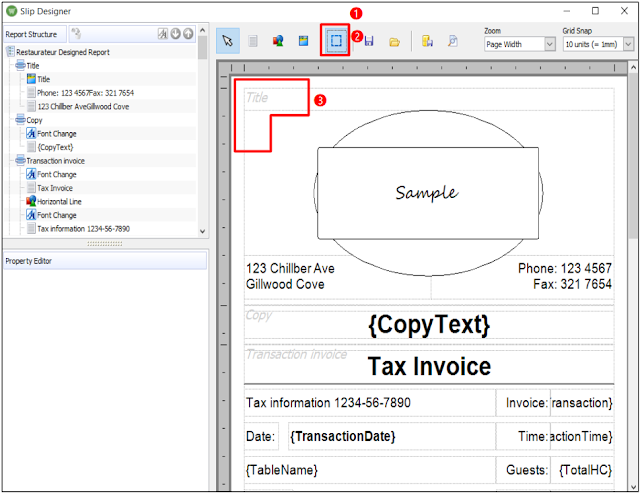
การกำหนดค่า: การตั้งค่าภาพ
❶ Shopkeeper Slip Designer window
หน้าต่าง Shopkeeper Slip Designer
❷ Report Structure: Title
โครงสร้างรายงาน: หัวข้อ
➌ The Highlighted Area on the Report
➍ Image: select the Folder (yellow folder button)
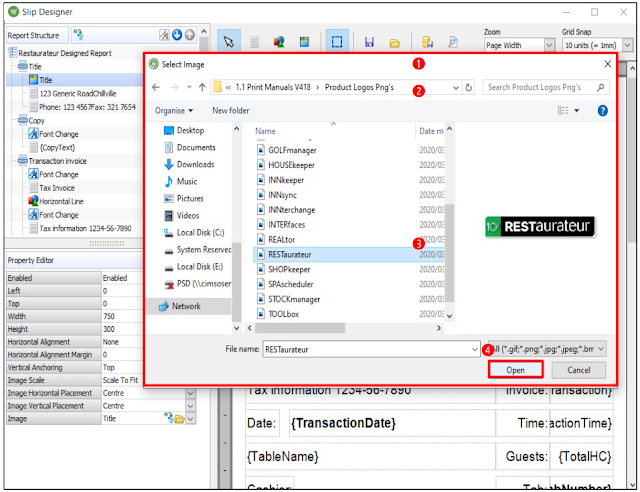
การกำหนดค่า: การตั้งค่าภาพ
❶ Select Image window
หน้าต่าง Select Image
❷ Folder Location
ตำแหน่งของแฟ้มเอกสาร
➌ Locate & Select: select to highlight the required image
ค้นหาและเลือก: เลือกเพื่อไฮไลท์ภาพที่ต้องการ
➍ Select the Open button
เลือกปุ่ม Open
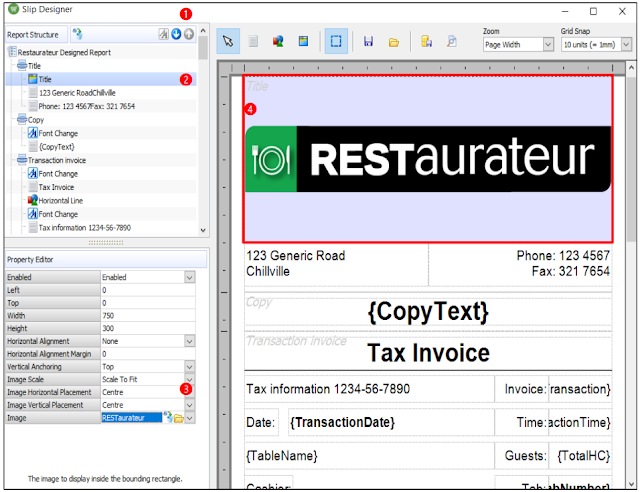
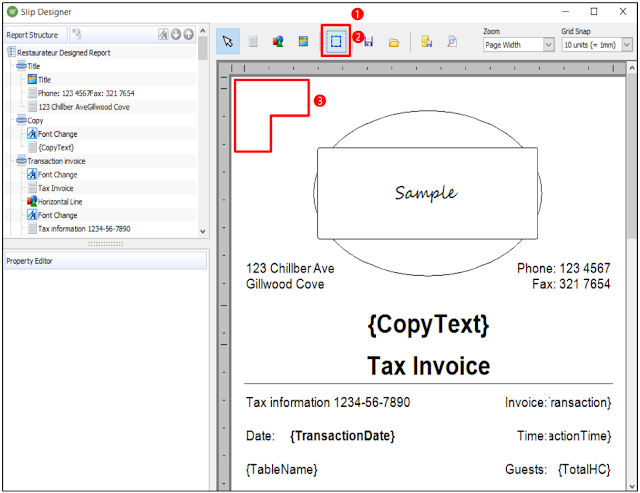
การกำหนดค่า: การตั้งค่าภาพ
❶ Shopkeeper Slip Designer window
หน้าต่าง Shopkeeper Slip Designer
❷ Report Structure: Title
โครงสร้างรายงาน: หัวข้อ
➌ Image: the Added Image File
ภาพ: ไฟล์ภาพที่เพิ่มเข้ามา
➍ The Added Image
ภาพที่เพิ่มเข้ามา
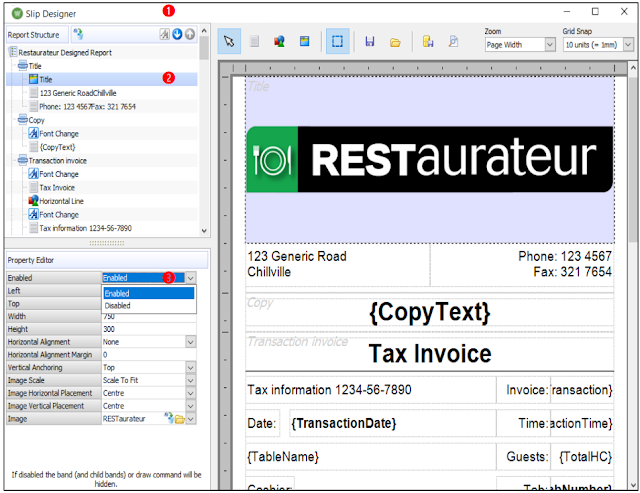
การกำหนดค่า: เปิดใช้งาน
❶ Shopkeeper Slip Designer window
หน้าต่าง Shopkeeper Slip Designer
❷ Report Structure: Title
โครงสร้างรายงาน: หัวเรื่อง
➌ Enabled: use the Drop Down to access the list of options
เปิดใช้งาน: ใช้เมนูแบบเลื่อนลงเพื่อเข้าถึงรายการตัวเลือก
หมายเหตุ:ตัวกรอง / ตัวเลือกทั้งหมดใน Property Editor ที่เป็นแบบเลื่อนลงจะต้องใช้การเลือกจากเมนูแบบเลื่อนลงเพื่อเข้าถึงรายการตัวเลือก
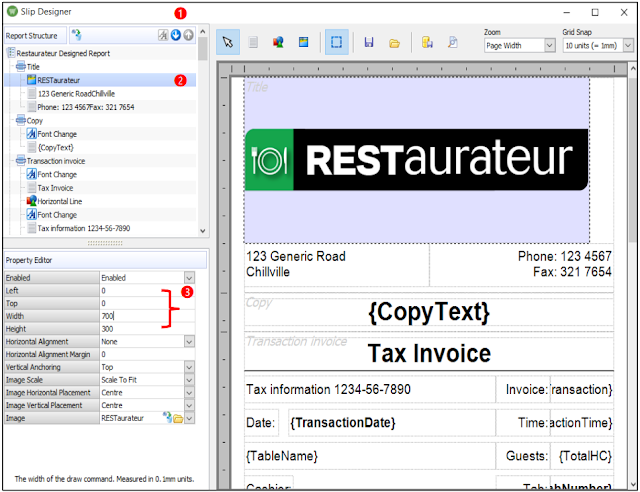
การกำหนดค่า: ซ้าย / ด้านบน / ความกว้าง / ความสูง
❶ Shopkeeper Slip Designer window
หน้าต่าง Shopkeeper Slip Designer
❷ Report Structure: Title
โครงสร้างรายงาน: หัวข้อ
➌ Left / Top / Width / Height: type in the relevant information to adjust changes to the slip template
ซ้าย / ด้านบน / ความกว้าง / ความสูง: พิมพ์ข้อมูลที่เกี่ยวข้องเพื่อปรับการเปลี่ยนแปลงในแม่แบบสลิป
หมายเหตุ: ตัวเลือกทั้งหมดที่เป็น 'การพิมพ์ / ช่องว่าง' จะอนุญาตให้พิมพ์การแก้ไขลงไป
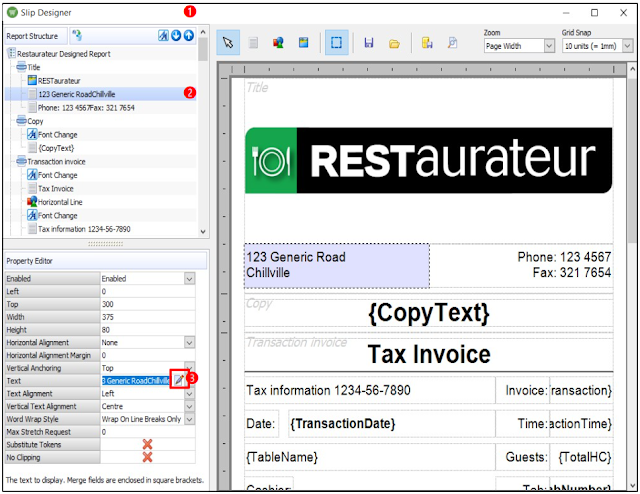
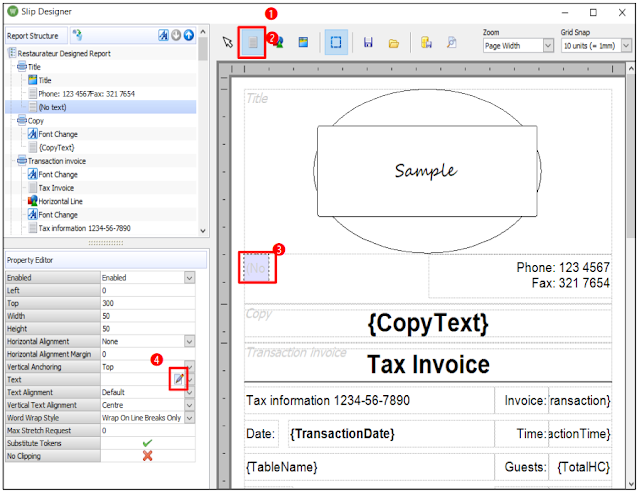
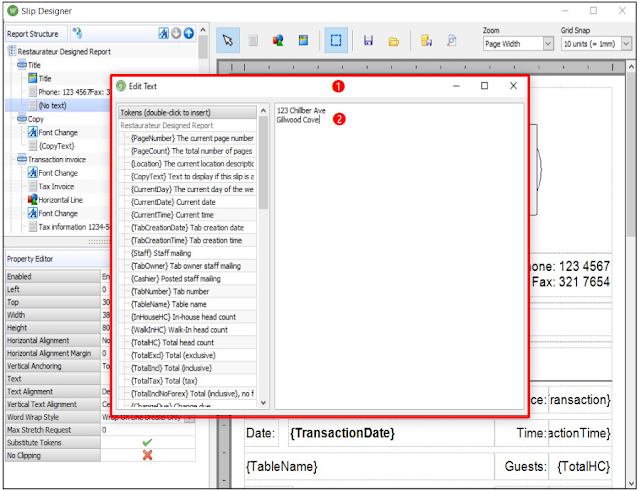
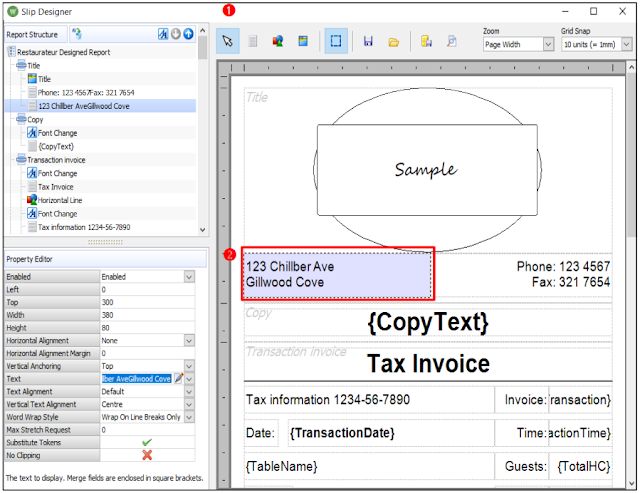
Configuration: Text – Edit Text
การกำหนดค่า: ข้อความ – แก้ไขข้อความ
❶ Shopkeeper Slip Designer window
หน้าต่าง Shopkeeper Slip Designer❷ Report Structure: Title
โครงสร้างรายงาน: หัวข้อ
➌ Text: select the Edit Text (page & pencil button)
ข้อความ: เลือกปุ่มแก้ไขข้อความ (ปุ่มกระดาษกับดินสอ)
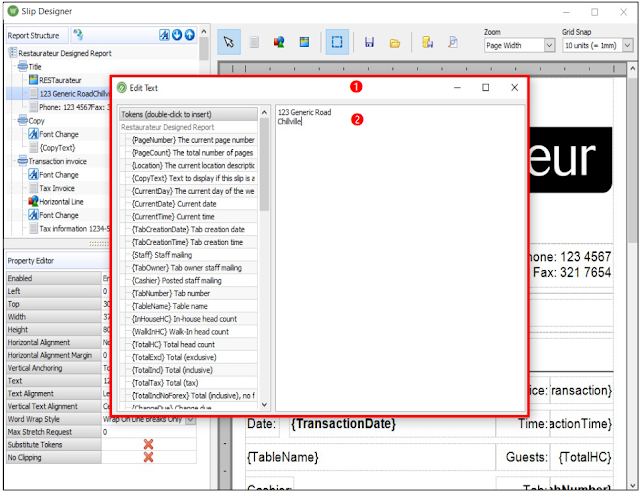
การกำหนดค่า: แก้ไขข้อความ - ประเภท
❶ Edit Text window
หน้าต่าง Edit Text
❷ Type in the Text details
พิมพ์รายละเอียดข้อความ
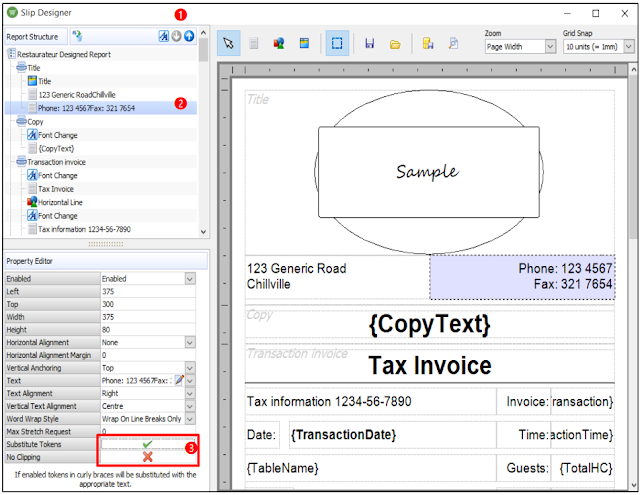
การกำหนดค่า: แทนที่โทเคน / ไม่ตัดขอบ
❶ Shopkeeper Slip Designer window
หน้าต่าง Shopkeeper Slip Designer
❷ Report Structure: Title
โครงสร้างรายงาน: หัวเรื่อง
➌Substitute Tokens / No Clipping: select to Enable (green tick button) or Disable (red cross tick button)
แทนที่โทเคน / ไม่ตัดขอบ: เลือกเพื่อเปิดใช้งาน (ปุ่มติ๊กสีเขียว) หรือปิดการใช้งาน (ปุ่มติ๊กสีแดง)
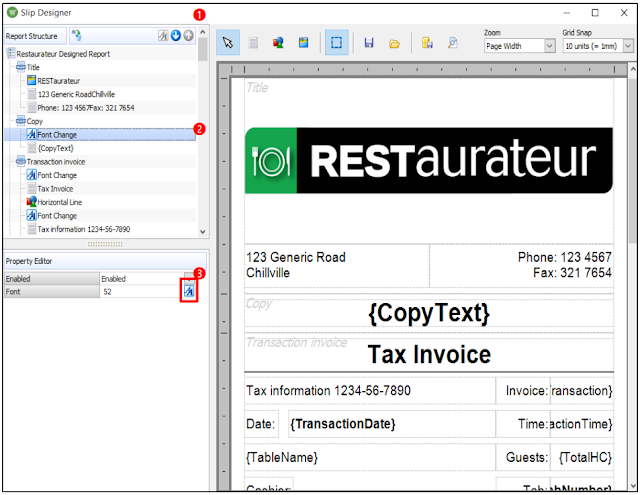
การกำหนดค่า: แบบอักษร
❶ Shopkeeper Slip Designer window
หน้าต่าง Shopkeeper Slip Designer
❷ Report Structure: Font Change
โครงสร้างรายงาน: การเปลี่ยนแบบอักษร
➌ Font: select the Edit Font (Letter box button)
แบบอักษร: เลือกปุ่มแก้ไขแบบอักษร (ปุ่มกล่องตัวอักษร)
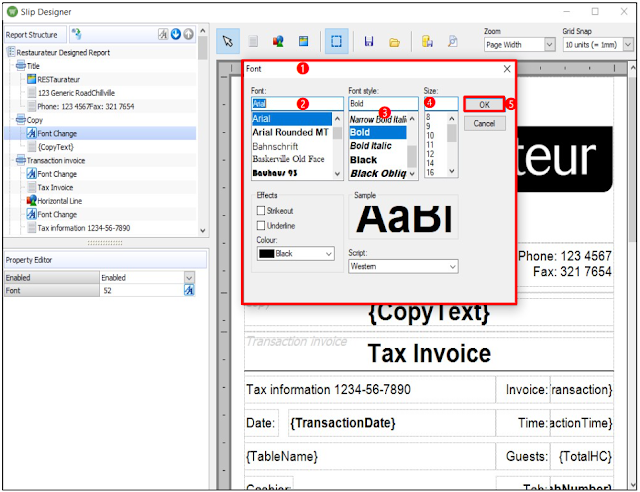
การกำหนดค่า: แบบอักษร
❶ Font window
หน้าต่าง Font
❷ Font: select the desired Font type
แบบอักษร: เลือกประเภทแบบอักษรที่ต้องการ
➌ Font Style: select the desired Font style
สไตล์แบบอักษร: เลือกสไตล์แบบอักษรที่ต้องการ
➍ Size: select the desired Font Size
ขนาด: เลือกขนาดแบบอักษรที่ต้องการ
❺ Select the OK button
เลือกปุ่ม OK
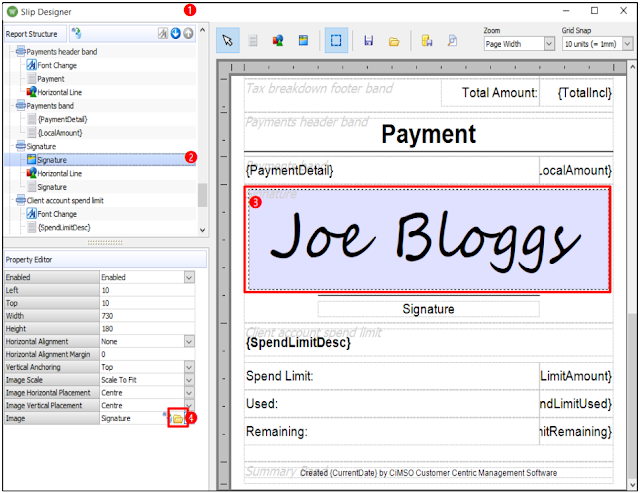
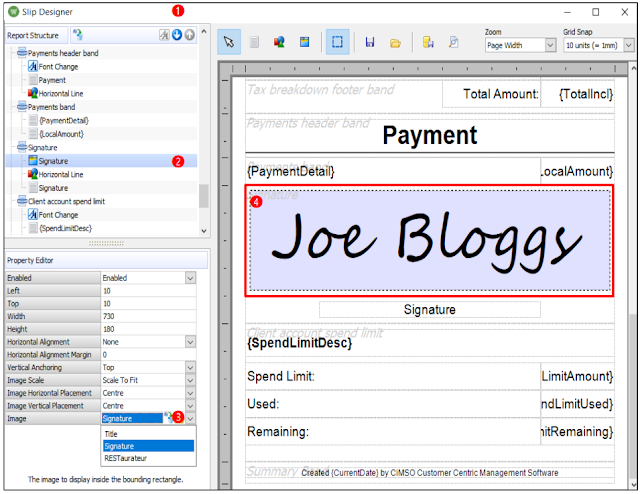
การกำหนดค่า: การตั้งค่าภาพ
❶ Shopkeeper Slip Designer window
หน้าต่าง Shopkeeper Slip Designer
❷ Report Structure: Signature
โครงสร้างรายงาน: ลายเซ็น
➌ The Highlighted Area on the Slip
พื้นที่ที่ไฮไลท์ในสลิป
➍ Image: select the Folder (yellow folder button)
ภาพ: เลือกแฟ้มเอกสาร (ปุ่มแฟ้มเอกสารสีเหลือง)
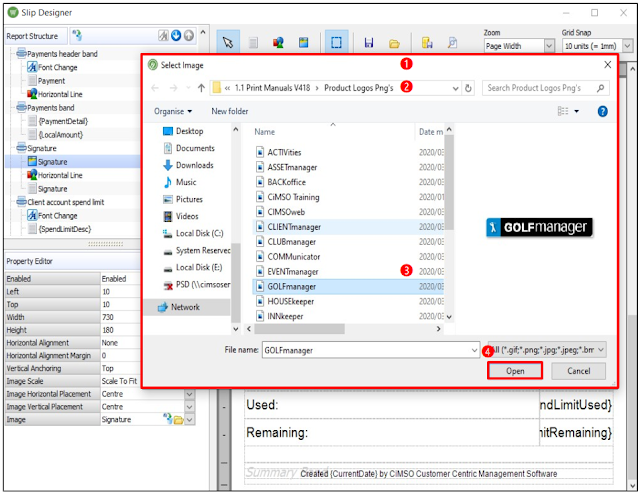
การกำหนดค่า: การตั้งค่าภาพ
❶ Select Image window
หน้าต่าง Select Image
❷ Folder Location
ตำแหน่งโฟลเดอร์
➌ Locate & Select: select to highlight the required image
➍ Select the Open button
เลือกปุ่ม Open
การกำหนดค่า: การตั้งค่าภาพ
❶ Shopkeeper Slip Designer window
หน้าต่าง Shopkeeper Slip Designer
❷ Report Structure: Signature
โครงสร้างรายงาน: ลายเซ็น
➌ Image: the Added Image File
ภาพ: ไฟล์ภาพที่เพิ่มเข้ามา
➍ The Added Image
ภาพที่เพิ่มเข้ามา
การกำหนดค่า: การตั้งค่าภาพ
❶ Shopkeeper Slip Designer window
หน้าต่าง Shopkeeper Slip Designer
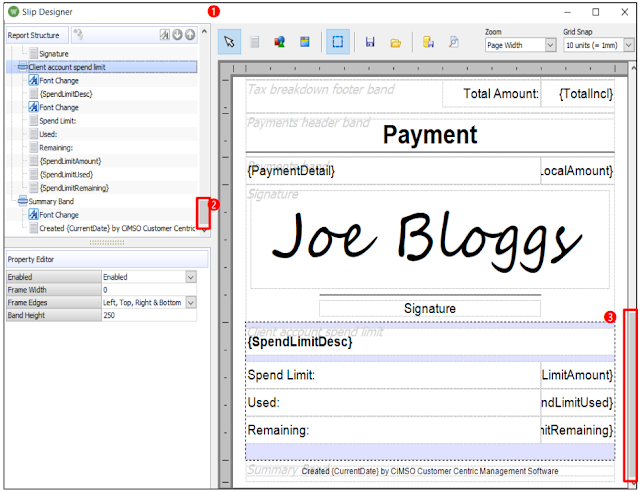
❷ Report Structure: use the Up/Down Scroll Bar to access the list of Filters & Options
โครงสร้างรายงาน: ใช้แถบเลื่อนขึ้น/ลงเพื่อเข้าถึงรายการตัวกรองและตัวเลือก
➌ Editable Report Template: use the Up/Down Scroll Bar to access the list of Filters & Option
แม่แบบรายงานที่แก้ไขได้: ใช้แถบเลื่อนขึ้น/ลงเพื่อเข้าถึงรายการตัวกรองและตัวเลือก
หมายเหตุ: คุณสามารถเพิ่มหรือลดจำนวนกล่องข้อความ / ภาพ / รูปร่างตามที่ต้องการผ่านแม่แบบ
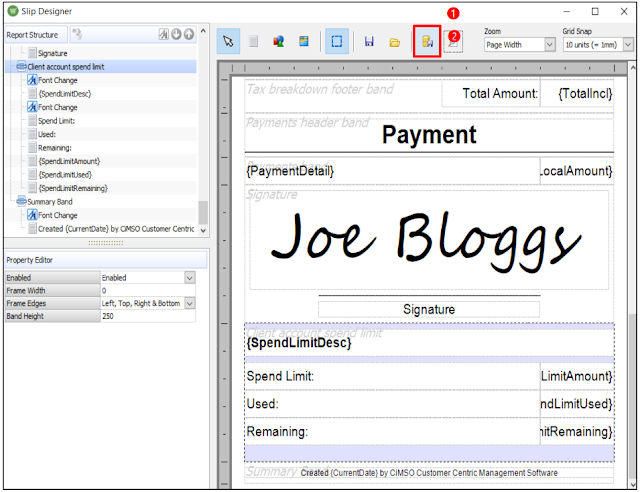
การกำหนดค่า: อัปเดตฐานข้อมูล
❶ Shopkeeper Slip Designer window
หน้าต่าง Shopkeeper Slip Designer
❷ Select the Update Database (yellow tower & disk button)
เลือกปุ่มอัปเดตฐานข้อมูล (ปุ่มหอคอยสีเหลืองและดิสก์)
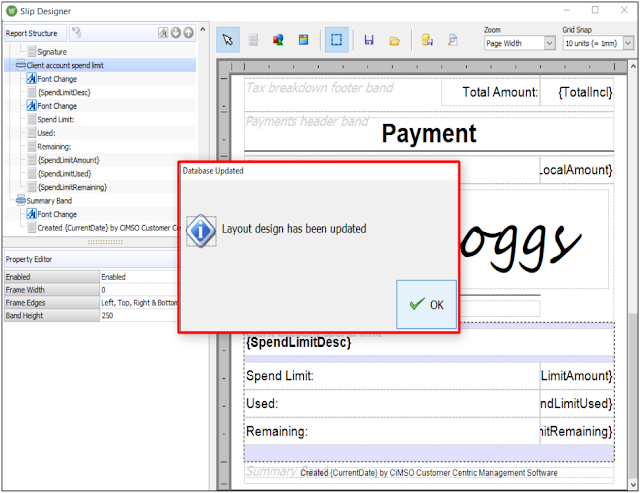
หน้าต่างฐานข้อมูลได้รับการอัปเดต ซึ่งยืนยันว่าออกแบบเค้าโครงได้ถูกอัปเดตในฐานข้อมูลแล้ว
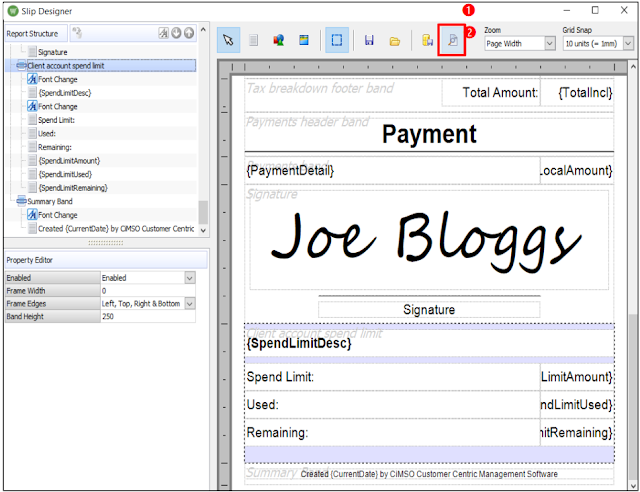
การกำหนดค่า: ดูตัวอย่างรายงาน
❶ Shopkeeper Slip Designer window
หน้าต่าง Shopkeeper Slip Designer
❷ Select the Preview Sample Slip (page & magnifying button)
เลือกปุ่มดูตัวอย่างสลิป (ปุ่มกระดาษกับแว่นขยาย)
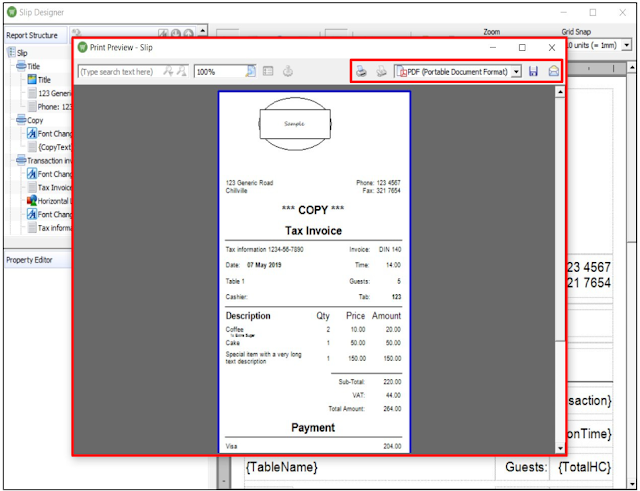
การดูตัวอย่างการพิมพ์ คุณสามารถพิมพ์ บันทึก ส่งแฟกซ์ หรือส่งอีเมลรายงานสลิปได้
Contact us
If you need a consulting system and ERP system for a service business. (Golf software hotel management software
Resort management software Event management software, restaurants, food and beverage and central kitchen
management software, spa software, wholesale retail management Franchise management and other service
businesses)
You can contact CiMSO ERP Software for a short demonstration (free online) at 02-1296312 or


